Broadcast view: a vision mixer and live streaming for your own server
Broadcast view exists only on self-hosted ScreenTinker, from version 3.2.0. On hosted ScreenTinker (screentinker.com) you won't find it: there is no Broadcast button, and the mixer and streaming are switched off.
The reason is the work it does. A live stream is encoded on the server itself, and each stream keeps one to two processor cores busy for as long as it runs. To do that, the server also runs a hidden web browser and the ffmpeg video program, and that browser opens your guests' cameras and microphones. That belongs on a machine you own and control, not on a shared hosted service. If you don't run your own server yet, start with the self-hosting guide.
Broadcast view turns the ScreenTinker dashboard into a production desk. You pick what goes on air, see it in Preview, and press Take to put it on your screens. You can lay a name caption or a news crawl over the picture, steer a camera, bring in guests from their own homes, mix the sound, and send the whole thing live to YouTube, Facebook, Twitch or any RTMP or SRT address. You can also show that live picture on your signage screens, so the overflow room sees what the stream sees.
It is made for the person running the screens and the livestream at a church service, a school assembly or a company town hall. This guide covers the desk, stream outputs, the sound console, guests, and what whoever looks after the server has to install.
Before you start
- A self-hosted server, version 3.2.0 or newer. Without it the Broadcast button does not appear.
- Playlists with something in them. Each one becomes a source on the desk: a welcome slide, the notices, the hymn words, a countdown video. Make them in Content and playlists.
- The desk itself needs nothing extra. Taking sources to your screens, graphics, scenes and camera control all work as soon as you switch to Broadcast view.
- Streaming, recording and guests need programs installed on the server: ffmpeg, Chromium, and PulseAudio for the programme's own sound. Until they are there, the Streams page says what is missing. See What the server needs.
- Guests need an https address. A browser only lets a guest use their camera and microphone on a secure (https) page, so put the server behind a reverse proxy with a certificate, as the self-hosting guide describes.
- Anyone in the workspace except a Viewer can use the desk. A Viewer can look, but can't take anything to air or start a stream.
Switch to Broadcast view
At the top of the menu there are three buttons: Simple, Advanced and Broadcast. Press Broadcast. The dashboard changes to a dark control-room look, the mixer becomes your home page, and the menu becomes the desk's sections: Mixer, Audio, Cameras, Graphics, Streams, plus Screens and Settings.
The choice belongs to your account, so it follows you to another computer. To get the usual signage menu back (content, playlists, schedules and the rest), press Advanced. Nothing on your screens changes when you switch.
The desk: Preview, Program and Take
The Mixer page is laid out like a broadcast desk.
- Sources: one key per playlist. Press one and it plays in Preview (the green monitor). Nothing changes on any screen yet.
- Outputs: one key per screen, plus a key for each stream destination. Select the ones the next Take goes to. All, None and a key per screen group select several at once.
- Program (the red monitor) shows what the first selected output is playing right now.
- Take puts Preview on the selected outputs. What was on Program drops back into Preview, so pressing Take again cuts straight back.
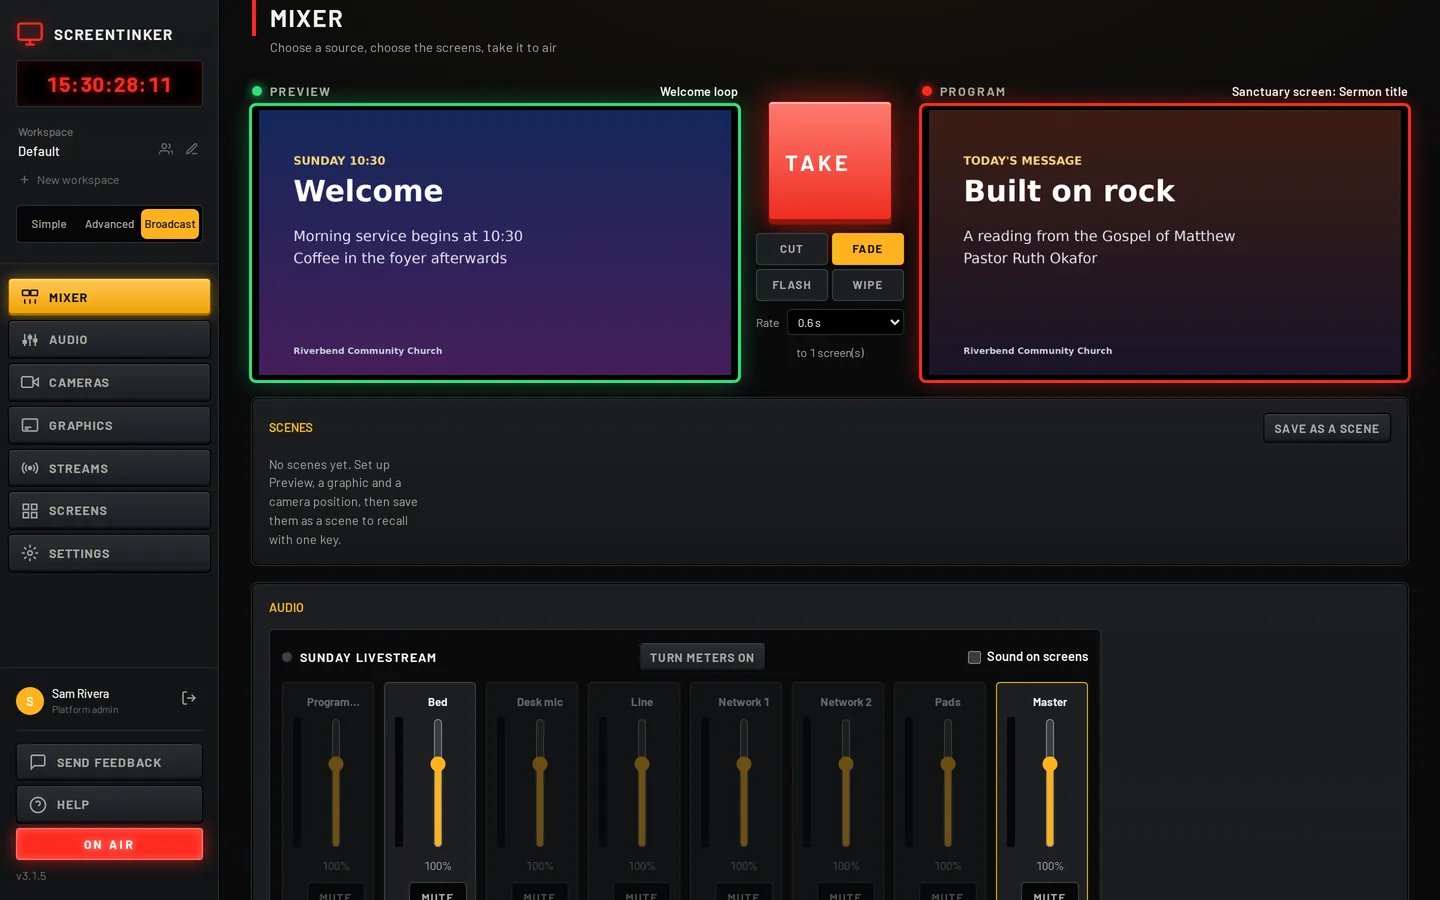
Pick the transition under Take: Cut, Fade, Flash or Wipe, and how long it lasts with Rate (0.3 to 2 seconds). Your choice is remembered in this browser.
Keyboard: 1 to 9 choose a source, Enter or Space takes, Esc clears graphics.
Take sets the screen's playlist, the same as choosing a playlist for that screen on the Playlists page. It stays after you close the desk. Screens running the web player (a browser, ChromeOS, a computer in kiosk mode) switch at once and show the transition. The other players, such as the Android, Raspberry Pi and Windows apps or a Samsung or LG screen, take the new playlist at the end of the item they are showing, with no transition. Screens that head office controls are skipped, and the message after Take says how many.
Scenes
A scene remembers a look so you can call it back with one key. Set up Preview, type a graphic's text, move a camera if you have one, then press Save as a scene and give it a name such as "Sermon" or "Wide shot". A scene can hold a source, a graphic and camera positions. Pressing a scene key gets it ready; Take puts it on air. A workspace can keep up to 100 scenes.
Graphics
On the Graphics page, select the outputs, type Line 1 and Line 2, choose a Colour, and press a key:
- Lower third: a name and title along the bottom left.
- Crawl: a ticker along the bottom.
- Bug: a small label in the top right corner.
- Title card: full screen.
- Countdown: put the time on Line 1, like
5:00, or10for ten minutes. - Comment: who said it, and what they said.
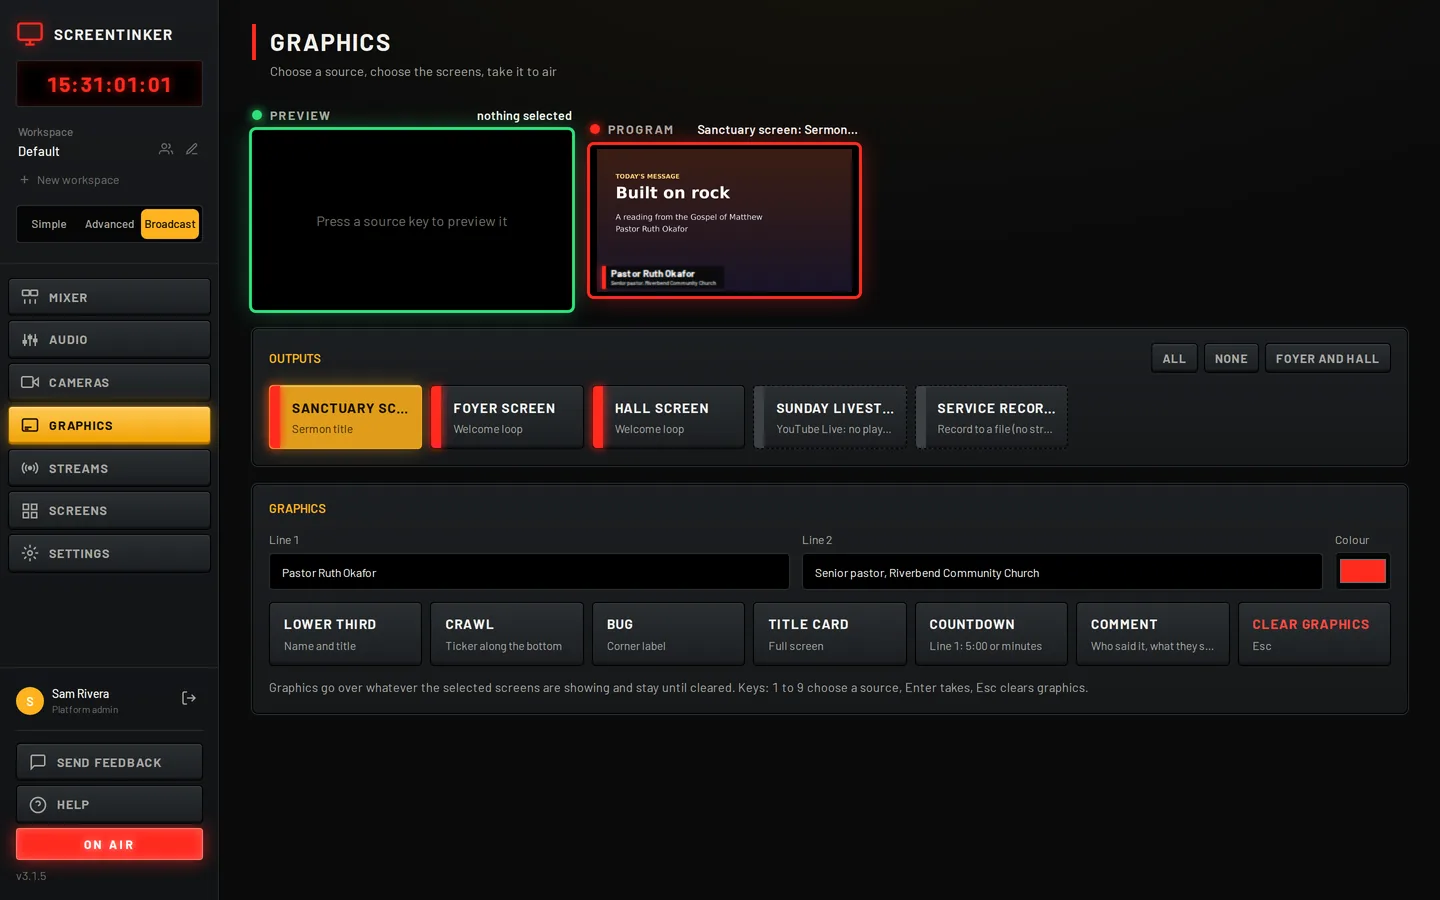
A graphic goes over whatever the selected outputs are showing and stays until you clear it. On a stream it is drawn into the stream's picture. On a screen it uses the screen's picture-in-picture overlay, so a screen whose player can't show overlays won't show it; the message after you press the key says how many outputs took it.
Camera control
If you have a network camera that can pan, tilt and zoom, and it speaks ONVIF, add it in Content as a camera first (see the ONVIF camera notes). It then appears on the Cameras page. Choose it, then steer it with the arrows, Home, Zoom in, Zoom out and Speed, or jump to one of its saved Presets. A scene can move cameras to their presets when you take it.
Stream out: YouTube, Facebook, Twitch, RTMP, SRT
A stream destination is an output like a screen: you take a source to it, key graphics over it and put guests in it. The difference is that the server turns its picture and sound into a live video and sends it to a streaming service.
- Open Streams and press Add a destination.
- Name it, for example "Sunday livestream".
- Stream to: YouTube Live, Facebook Live, Twitch, Custom RTMP / RTMPS, SRT, or Record to a file (no stream).
- Paste the Stream key from the streaming service. For Custom RTMP, also fill in the Server address (it starts with
rtmp://orrtmps://). For SRT, the address starts withsrt://, and options such as the stream ID or passphrase go in the key box. - Choose the Picture: 720p or 1080p. Tick Record to also keep a copy on the server.
- Press Save destination.
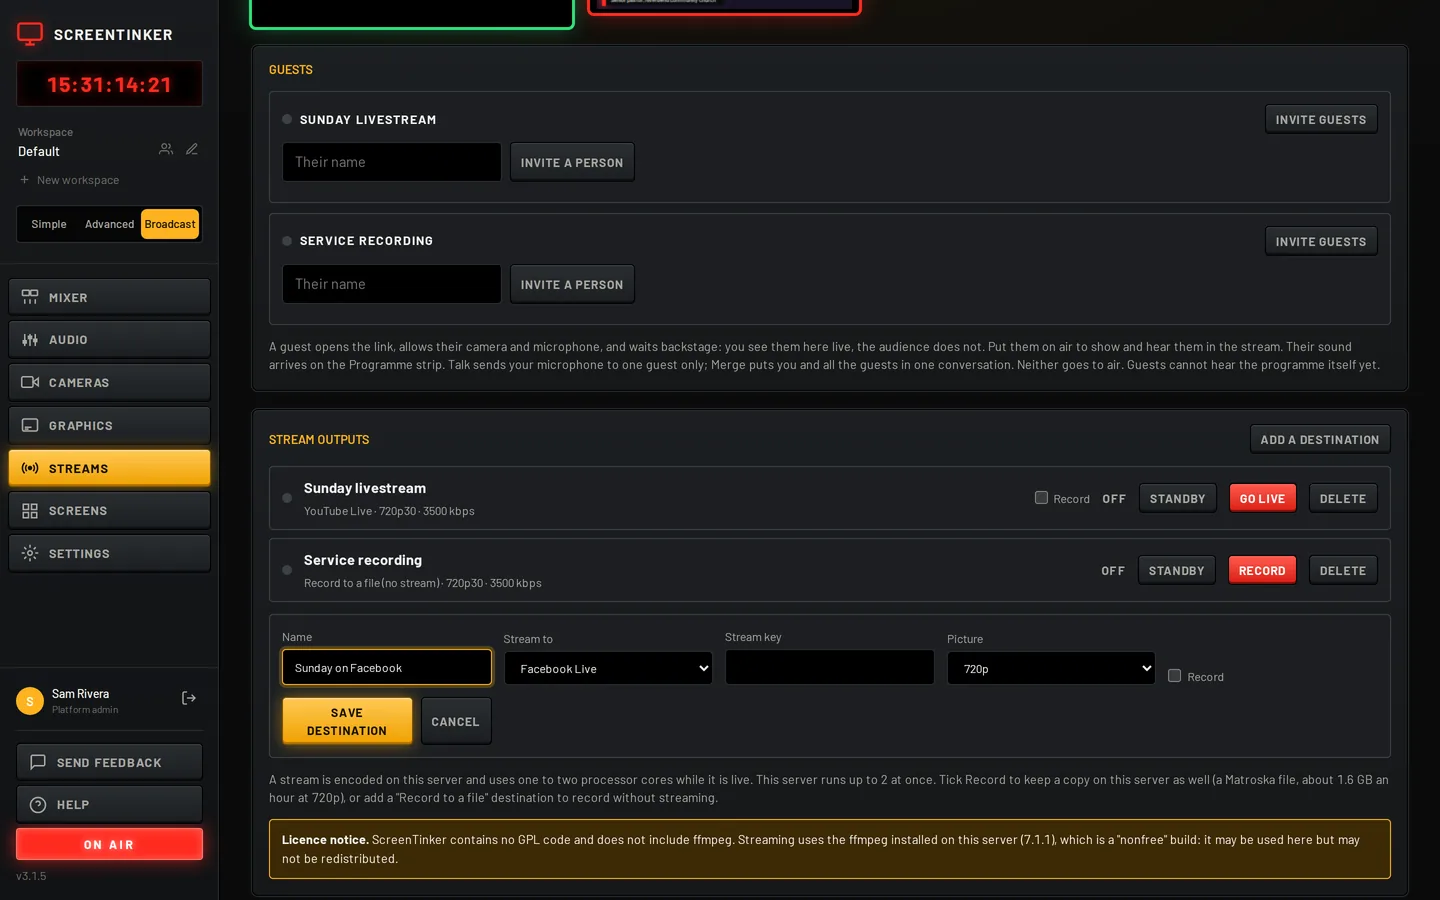
The stream key is stored encrypted and never shown again. To change other settings later, leave the key box empty and the saved key is kept. A stream must be stopped before you change it.
Standby, Go live and Stop
- On the Mixer page, select the stream's output key, choose a source, and press Take. A stream with nothing taken to it can't go live.
- Press Standby. Everything starts except the sending: the picture is drawn, inputs are connected and the meters move, so you can set levels, invite guests and check the look. Nothing leaves the building.
- When you are ready, press Go live. It takes a few seconds to come up. The row then says Live, or Reconnecting if the connection to the service drops.
- Press Stop stream when you are done.
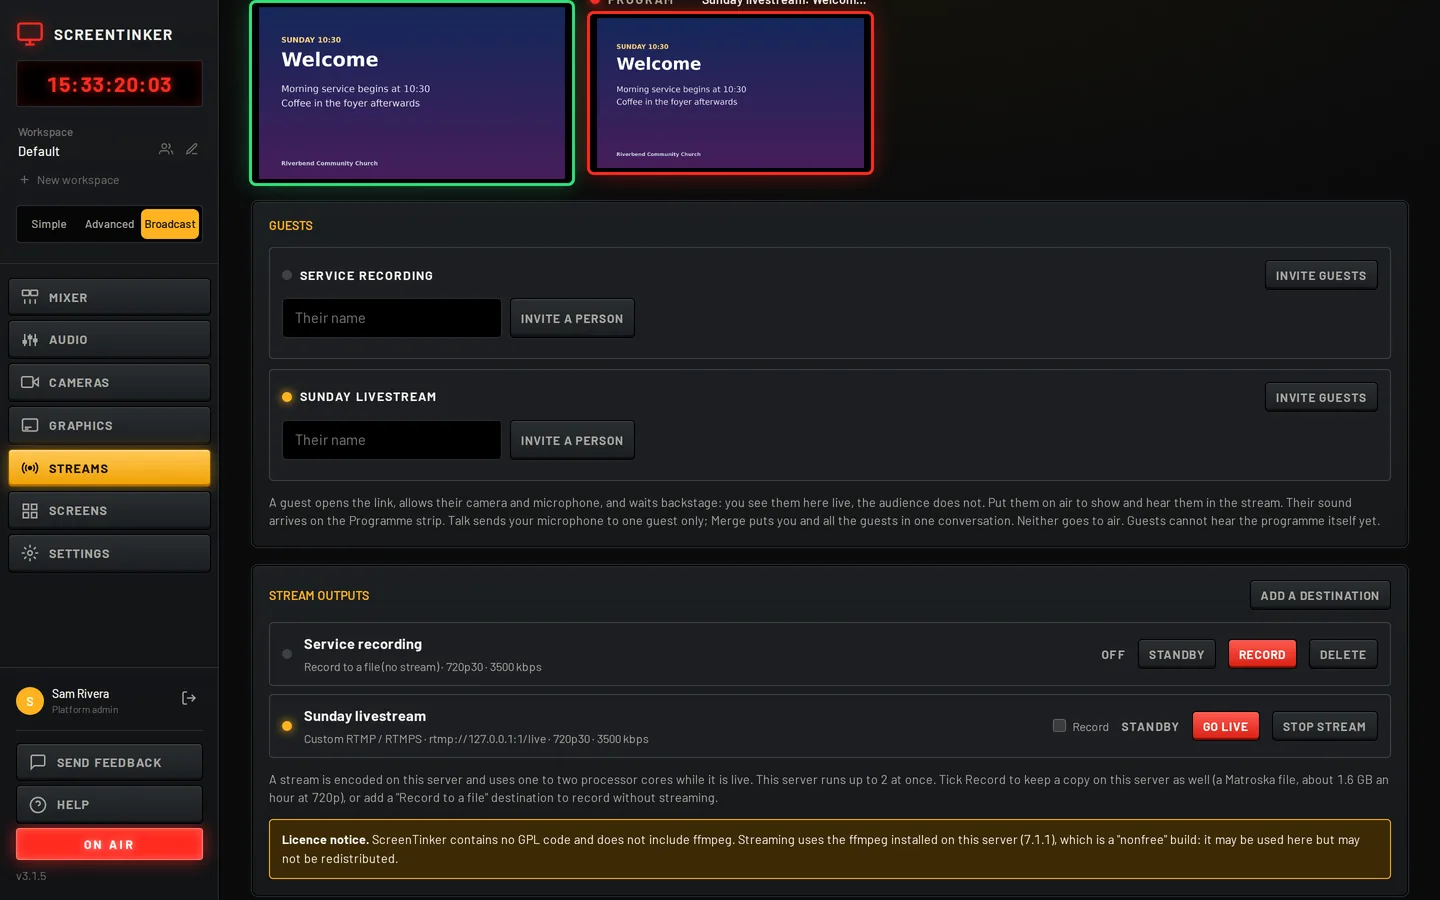
If the server restarts while a stream is running (an update, a power cut), the stream comes back on standby, never live by itself: going live is always your decision. A server runs up to 2 streams at once unless whoever runs it changes that (see What the server needs).
Recording
Tick Record on a stream to save a copy while it streams, or add a Record to a file destination to record without streaming (its button says Record instead of Go live). Recordings are Matroska (.mkv) files, about 1.6 GB an hour at 720p, kept on the server. They are listed under Recordings with Download and Delete. A recording doesn't start when the server has less than 2 GB free; the stream row says so.
The sound console
The Audio page gives each stream its own mixing desk. Each input is a strip with a meter, a fader, Mute and EQ / FX, and they all feed the Master, which ends in a limiter so the sound doesn't clip. Every control works live.
- Programme: the sound of the videos in the source you took. This needs PulseAudio on the server; without it the strip is greyed out and a note says so.
- Bed: an audio file from Content, looped under everything.
- Desk mic: the microphone of the computer you have the desk open on. Press Use this computer's microphone.
- Console on this server: a mixing desk or multichannel sound card plugged into the server by USB, each channel on its own strip.
- Line: a sound card input on the server.
- Network 1 and Network 2: a sound feed from the network, for example an SRT, RTSP, RTP, UDP or RTMP address, or an internet radio stream.
- Pads: up to 12 sound clips (a jingle, a chime, applause) fired with one press. Press Set up pads to choose the audio files, name them, set their levels and loop them.
- A strip for each guest, while they are here (see Guests).
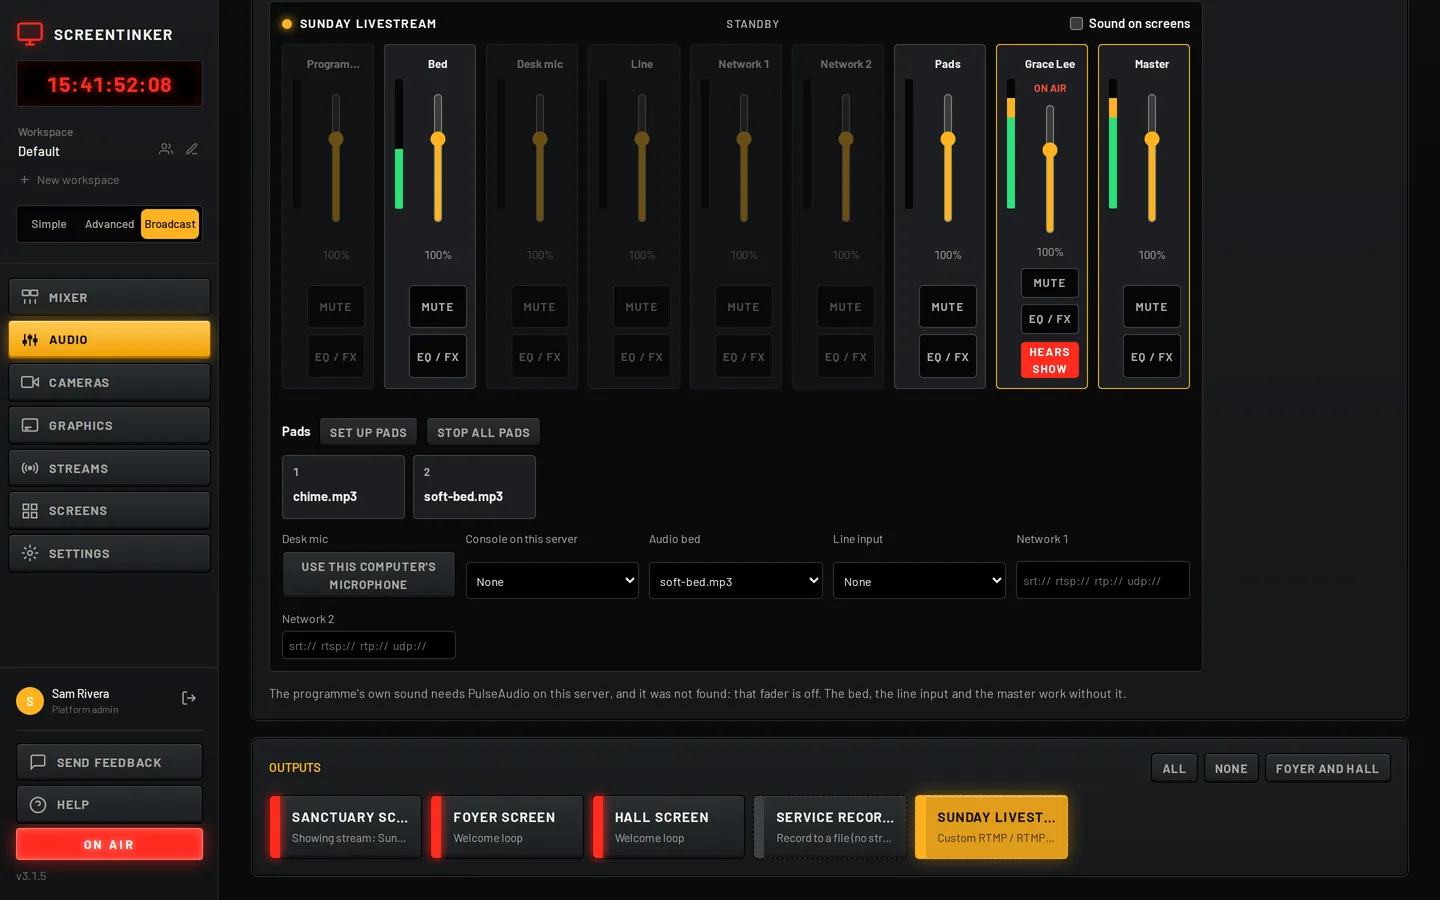
EQ / FX opens a strip's processing: trim, pan, high-pass and low-pass filters, a noise reducer that can learn a room's hum, a four-band equaliser, gate, de-esser, ducking under speech, a compressor, and sends to reverb, delay and chorus. Set flat puts a strip back to neutral. You don't need any of it to get started: the faders and mutes are enough.
Tick Sound on screens to give screens that show this stream its sound as well. When screens are selected on the desk, they get their own volume faders on this page too.
Guests
A guest is someone who joins from their own phone or computer, such as a missionary calling in, a parent on a school trip, or a speaker at another site. They need only the link: no app and no account.
- In Guests on the Streams page, press Invite guests next to the stream. The link is copied. Anyone with it can join, for 12 hours. Or type a name and press Invite a person for a link that only one person can use at a time.
- Send the link. The guest opens it, allows their camera and microphone, types their name and presses Join.
- They wait in the green room (Backstage). You see them live on the desk; the audience doesn't.
- Press Put on air to show and hear them in the stream, and Take off air to send them back.
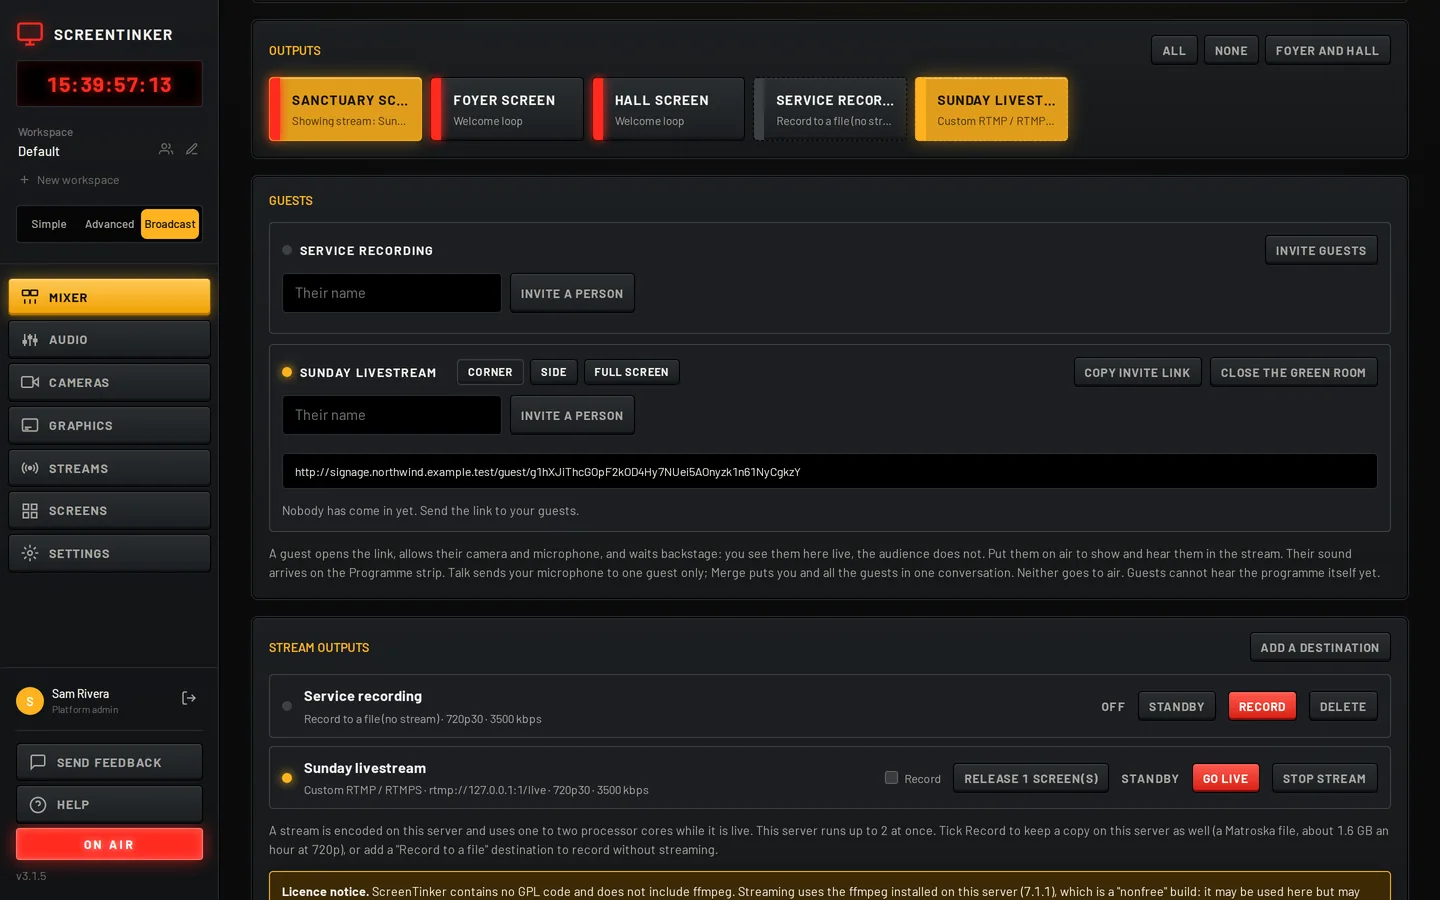
- The stream must be on Standby or Live before a guest can go on air. You can see and hear guests while it is off.
- Up to 6 guests can be in a stream's green room, and up to 4 can be on air at once. Corner, Side and Full screen set where they appear.
- Volume sets how loud that guest is in the stream. Listen lets you hear a guest on your computer only.
- Talk sends your microphone to one guest, and Merge puts you and all the guests in one conversation. Neither goes to air: use them to cue people.
- Hears show (on the guest's strip on the Audio page) sends the guest the show in their ear without their own voice, a "mix-minus", so they don't hear themselves echo back late. Turn it off for a guest on speakers who causes echo.
- Cut out shows the guest without their background, over the programme. It needs a green background: the guest ticks Remove my background on their page (it runs on their device, and a slow device says so), or stands in front of a real green screen.
- Remove takes a guest out. Someone who came in by the room link could come back by it, so to keep them out press Close the green room (twice, a few seconds apart). That disconnects everyone and the link stops working.
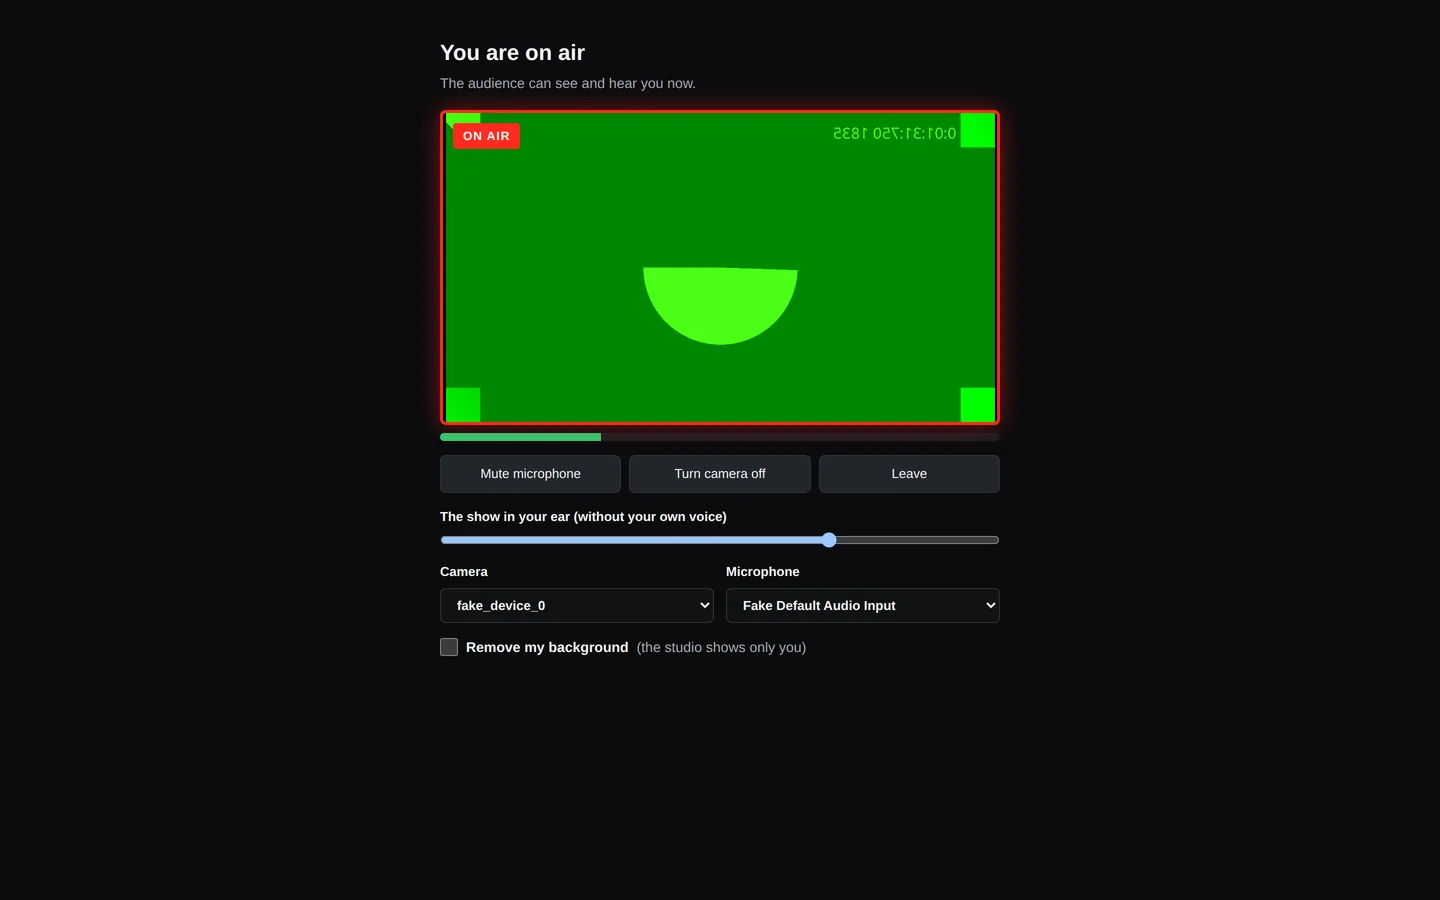
Guests connect straight to your server's streaming browser over WebRTC, the way video calls do; their picture and sound don't pass through ScreenTinker's own process. If guests outside your building can't connect, your network may need a STUN or TURN server; the server uses the same settings as live video and Talk. If your desk's browser hides its network addresses (some VPN and privacy settings), it can't show guests live, but the stream itself is not affected, and the desk says so.
Show the stream on your screens
You can put a stream's finished picture, with its graphics and on-air guests, on your signage screens: the foyer, the overflow room, the hall. On the Mixer page, select the stream's output key together with the screens, then press Show (stream name) on (n) screen(s). The stream must be on standby or live.
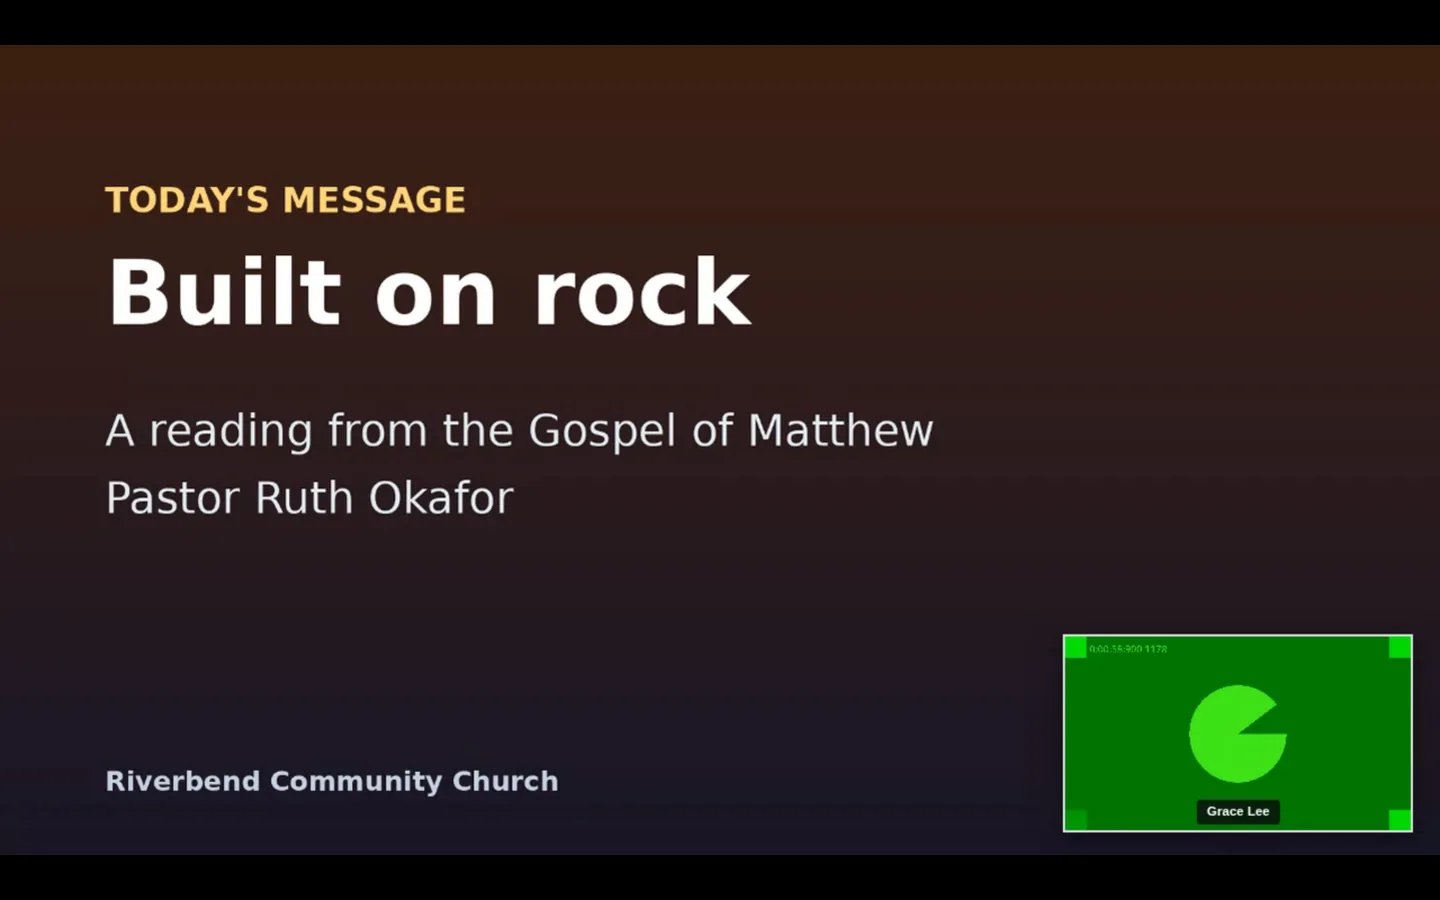
- The picture goes over whatever the screen was playing. The screen's key on the desk says Showing stream. Press Release (n) screen(s) on the stream's row on the Streams page to give each screen its own content back.
- A screen that is offline, or showing something else that was shared to it, gets the stream as soon as it can. One that reloads or drops off the network is given it again by itself. Stopping the stream releases its screens.
- It uses screen sharing, so screen sharing must be on for the server and the workspace, and the screen's player must be able to show a share: the web player, the Android app, the Raspberry Pi, Windows and macOS apps, the iPad app, and Samsung Tizen 10 or newer. LG webOS, BrightSign, Fire TV (Vega) and Roku can't. The message after you press the button names any screen that can't and says why. More detail is in the screen share notes.
- A screen shows the picture only, unless you tick Sound on screens on the Audio page.
What the server needs
This part is for whoever looks after the server. The desk works on any self-hosted install. Stream outputs, recording, guests and showing a stream on screens need these programs installed as normal system packages on the machine that runs the server. ScreenTinker doesn't bundle them.
- ffmpeg: encodes the stream. The official Docker image already includes it.
- Chromium: the hidden browser that draws the stream. Install it and set
CHROME_PATHto it (for example/usr/bin/chromium). The official Docker image does not include a browser. Use Chromium itself: in our testing, a branded Google Chrome build drew and mixed the stream, but couldn't show it on screens, because it refuses the small extension ScreenTinker loads for that. - PulseAudio (the
pulseaudioandpulseaudio-utilspackages): carries the programme's own sound into the mix. Without it everything else works, and the Programme strip stays off. The server starts PulseAudio itself if it is installed but not running. - Xvfb (optional): with it, the stream captures every frame, so camera pictures and videos move smoothly. Without it the stream still works, but moving pictures top out at about 10 to 15 frames a second.
- A user called
st-render, when the server runs as root (as it does in Docker). The hidden browser opens guests' cameras, and inside a container Chromium's own safety sandbox can't run, so ScreenTinker runs the browser as this separate user instead. It then can't read the database, keys or uploads, and the server makes those folders private to their owner. The official Dockerfile already creates the user. On a plain Linux install running as root, create it withuseradd --system --no-create-home --shell /usr/sbin/nologin st-render. - With Docker Compose, keep
init: true(it is indocker-compose.example.yml). A stream's browser leaves a few small processes behind each time it stops, and this collects them. - An https address for guests, and screen sharing switched on (it is unless
SCREEN_SHARE_ENABLED=false) for showing a stream on screens.
On Docker, one way is a small image built on the official one:
FROM ghcr.io/screentinker/screentinker:latest
RUN apt-get update \
    && apt-get install -y --no-install-recommends chromium pulseaudio pulseaudio-utils xvfb \
    && rm -rf /var/lib/apt/lists/*
ENV CHROME_PATH=/usr/bin/chromium
Restart the server after installing, and open Streams: if something is still missing, the page says which. Each stream uses one to two processor cores while it runs. The server runs 2 at once by default; STREAM_OUT_MAX changes that, from 1 to 8.
ScreenTinker contains no GPL code and does not ship ffmpeg. It runs whatever ffmpeg you installed, as a separate program. The Streams page reads that ffmpeg and shows a licence notice: most distribution builds are GPL, which is fine to run but applies to that ffmpeg if you redistribute the server together with it; a "nonfree" build may be used but not redistributed; an LGPL build gets a short note. Chromium and PulseAudio are likewise your system's own packages under their own licences.
FAQ
Can I use this on screentinker.com?
No. Broadcast view, the mixer and streaming exist only on self-hosted servers. See the box at the top of this page for why.
Does it stream to two places at once?
Add a destination for each and go live on each one. Every running stream is encoded separately and uses its own processor cores, up to the server's limit (2 unless changed).
Will a press of Take change what my screens play after the service?
Yes. Take sets the screen's playlist, and it stays until you change it. Take the usual playlist back at the end, or change it on the Playlists page.
A guest can't turn on their camera.
The link must be https: browsers block cameras on plain http pages, and the guest's page says so. Also check that the guest allowed the camera and microphone when their browser asked.
Run it on your own server
Broadcast view comes with every self-hosted ScreenTinker server, free and open source.
Or try signage first on hosted ScreenTinker: start a free trial · GitHub